
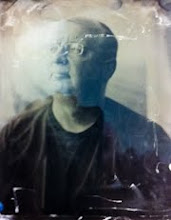
Elk Lake, New Year's Day 2011
Paul Romaniuk
Photopolymer gravure print
How do I judge whether a workshop I've just taken was successful? By the level of fatigue I feel the day after it ends. If I've become totally engrossed and engaged in the process being taught, I find I barely sleep for the entire length of the workshop because I'm over-stimulated (occupational hazard of the introvert). It's the day after a 5 day workshop with Don Messec on photopolymer gravure that was held at Lúz Gallery and I'm totally wiped. It was just that outstanding!

Tanya's plate on the press, ready for printing
Don is gregarious, opinionated, sharp-witted, extremely knowledgeable and simply an excellent teacher. He has done extensive research into methods of printmaking from the position of always questioning whether there is a safer and better way to make prints. His research into gravure printing has resulted in a safe process using photopolymer "solarplates" (that are developed in water and are non-toxic) and soy-based Akua intaglio inks. Don's process results in prints that exceed the quality achieved with traditional gravure methods that involve working with extremely hazardous chemicals and toxic ink formulations. So not just safer, but better prints as well.

Some of the plates from the workshop
I knew right from the start that this was going to be a great learning experience. Don began by telling us that he was definitely going to teach us how to make photopolymer gravure prints, but his top priority was to give us the information and teach us the skills to get the process up and running in our own studios with our own equipment.
In a nutshell, the process involves printing a positive image on a transparency using an inkjet printer, and then laying that transparency on top of a photopolymer plate to expose it to UV light, which hardens the emulsion on the plate according to how much light each area receives as it passes through the image on the transparency. Success relies on two key aspects: knowing what the optimal exposure time is, and knowing how to adjust the image before printing the transparency to hold detail in the shadows on the exposed photopolymer plate. It would have been far easier for Don to do all the pre-testing of the equipment to determine optimal exposure time and tonal adjustments the day before the workshop, so he could just "dial us in". Everyone would have immediately begun making good prints using the parameters he had pre-determined, but we would have been completely clueless how to accomplish that same level of achievement once the workshop was over and we were in our own studios.
Instead we worked as a group to make the test plates that were used to determine the optimal exposure time with the simple UV unit on hand, and then followed that with the necessary testing to determine how much to adjust the black point of the digital image to get a full tonal range on the final print. Don involved us all in the analysis of the test prints and explained the criteria that he uses to determine the optimal exposure and black point adjustment. It helped clarify the process for all of us.

Heather and Lynda inking plates, Tanya at the press
Would you agree to teach a course on stripping down and reassembling a diesel engine to a group of people who ranged from those who barely knew how to start their cars to others who had designed engines for decades? Pretty daunting task isn't it, not something most people would contemplate. Then add in the ringer that you aren't teaching this class in your well equipped shop, nor in some other garage, but in a pizza parlour with a good set of wrenches. It takes a special person to pull that off (and a good set of wrenches).
That's close to what Don agreed to do - come from his world class studio in Santa Fe to teach photopolymer gravure in Victoria, except not at an another artist's printmaking studio, but in an art gallery. The gallery is owned by Diana Millar and Quinton Gordon who together have a passion for building local capacity for making fine prints by a variety of methods - inkjet printing, traditional darkroom work, such "alt" processes as platinum/palladium printing, and also photogravure. The owners in question had a "good set of wrenches" - an etching press donated by a local artist, a space that could be dedicated for a week to the purpose of giving the workshop, and a ton of expertise in photo editing and printing with computers and high quality printers. Don drove up from Santa Fe carrying whatever else he could think would be needed to give the workshop.

The people taking the workshop were pretty evenly split between those who had never made an etching or other printmaking-type print in their lives, to several artists who had significant printmaking experience. Add in the differences in the level of expertise with editing images on a computer (as one student announced at the start of the class "I almost blew up my computer putting my images on that thing-a-majig" aka usb stick drive), and perhaps you can appreciate why I think Don was incredibly brave to take on the task of teaching this workshop.
Everyone went away with successful plates and prints, which is a testament to how effective Don is as a teacher, and how successful Quinton and Diana are at finding and attracting outstanding instructors, and how resourceful they all are at doing whatever is necessary to make a workshop like this succeed. For example, I know that Quinton arranged this workshop in part because he wants to be able to add photopolymer gravure printing to his personal artistic practice. However, when it became apparent that several participants would need expert assistance with image preparation, he took off his student's hat and gladly took on the role of expert image editor which basically occupied him for the entire workshop. In addition, several of the more experienced printmakers in the group helped out less experienced students with their inking, plate wiping and printing questions when Don was busy helping other students expose and process plates.

Heather pulls a gorgeous print off the press
Well - sounds like everything went swimmingly, doesn't it? Yes, yes it did although by a very circuitous route through initial failure and intensive problem solving. We were using 8"x10" solarplates with a simple gravity contact method - place solarplate face up, place transparency face down, cover with 1/2" plate glass and expose. The first couple of plates made gave very promising prints which were a bit dark but otherwise had good tonal range and outstanding line detail. Then an interesting problem arose - images with larger areas of light grey tones showed "measles" - random, small darker toned circles within the large grey area. In printmaking, large "flat" areas of light tones are always a technical challenge, regardless of whether printing by screen, litho plate or etching plate.
Well, as strange as it seems, this turned out to be one of the most effective learning opportunities we could have hoped for. Being a teacher myself, it was a privilege to watch the way Don got everyone involved in discussing and testing possible solutions to this problem. I think a large part of the "buy in" by the group was the atmosphere in the workshop - there was lots of lively discussion, witty repartee, back and forth teasing between Don and the students that was both entertaining and conducive to a relaxed environment. It took a day and a half and some late night testing by Don, but the problem was solved - the gravity system we were using wasn't giving complete contact between the transparency and the solarplate, leading to random differences in exposure in the large areas of flat tones. The solution was simple - just use plates smaller than 8x10, since the gravity frame provided good contact at smaller sizes. At that point everyone's work took off. More importantly we had all learned a great deal about the process and how to troubleshoot it if the need should arise in our own studios.

Just two of the many luscious prints pulled by other students in the workshop
Once this problem was solved, the plates were coming out of the processing room at a steady rate, and beautiful prints were flying off the press. In his own studio workshops, Don has students use a vacuum frame to ensure perfect contact between transparency and print. Quinton had been searching for a vacuum frame for some time, and fortuitously on the last full day of printing, he got a lead on one locally. He took Don with him to evaluate it, and with a little TLC Lúz Gallery will have it up and running shortly. As the workshop came to an end, I think we had every surface in the space buried under plates and prints. Diana and Quinton have learned that printmakers are like an insidious fungus that rapidly grows to cover all available surfaces.
I'm sure other students in the class will share their prints on their own websites or blogs. As for my own experience - absolutely sublime. I came with a range of images to test the process with, and have a valuable resource of prints to work from in my further experiments with this medium:


2 comments:
Hello Paul, thank you for posting all about the process, sounds fascinating! susan
Your prints are stunning, even on a computer screen! Reading about your experience is inspiring.
Post a Comment